Since I got back into consulting and coaching late last year, I’ve had the good fortune of helping out people who are completely new to niche sites and site building in general. For me, this has been a treat because I truly love helping out people who are just starting on their journey.
But it’s also made me realize that there are some gaps in my course for people who are 100% new to all of this and don’t know the basics of getting that article up and live on their WordPress site. Basically, I assumed some knowledge that some people just don’t have yet.
That’s why I shared my complete process on writing buying guides for your affiliate site a few months ago.
Building on that process tutorial, let’s look at the steps I go through when I’m preparing a new post for publication on my sites.
Always Write Your Title First
If you write your own content, then you know that often by the time you finish you are spent. Your brain just wants a break.
And if you don’t already have a title for your new article, then you know what happens next.
It’s just not happening for ya, right? Mental fatigue is for reals.
That’s why I always do my title first. But even then, there’s a bit of a challenge (and sometimes I’ll only get inspired at the end, which you’ll notice in a screenshot later).
It needs to be catchy but also good for SEO.
So, first things first – you should write it for humans, and not Google. You want something clickbaity enough to get people to click on it from Google, but not so outrageous that the absurdity sends them to another search result.
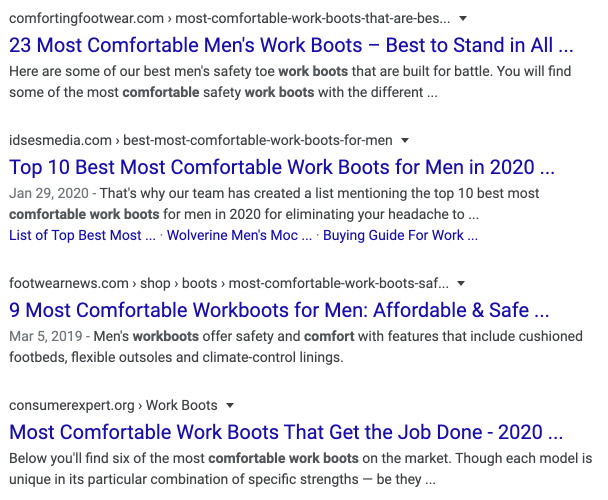
To give you a better idea of what I mean, take a look at these search results:

I’d guess that the first result and the last one get the most clicks here simply because the titles are more eye-catching. The whole “best to stand in” and “that get the job done” are the standout parts of the title.
These titles are written for people AND Google. You get your target keywords in there plus a little something to intrigue the humans.
The other results have titles that are written for Google. This used to be the way to go about things, but not so much these days.
And if you fill out your meta description, and you probably should, do that now too before the mental fatigue sets in.

Get Your Target Keywords In The Important Spots
This is one of those things that seems obvious, but can be easy to overlook.
If you’ve prepared your article outline like I’ve previously suggested, then you already have your list of target keywords as headings.
Check that you have your keywords where they need to be:
- Main keyword in the title
- Main or LSI keyword in the URL slug (we’ll get to this in a bit)
- Secondary keywords in your H2s, H3s, etc.
Honestly, that’s really all you need to know about this.

Sometimes when I include other keywords in the paragraphs, I will bold them. This is something that used to work, then stopped working….these days I have no idea if it’s working again, but I do it every so often.
Make It Readable On Mobile
Loads of people are visiting sites via their mobile devices. And you need to make sure that they have a good user experience on your site.
Eliminating any large blocks of text is how you do that.
When I get an article back from one of my writers, the first thing that I do is break up the text to make it more readable on mobile devices.
Use short paragraphs of one to two sentences.
Sometimes I will have a “paragraph” of only a single sentence. Most of the time it is two sentences. Three every now and then.
Leaving a single sentence on a line by itself is a great way to draw attention to something important.
Seriously.
It really makes that part of the page pop, whether using a mobile device or not.

Add Some Rich Media
If you’re creating buying guides for most of your content, then you’re probably already using product images. But that’s not enough.
You really gotta make an effort to get your content to stand out. And there’s plenty of ways to do that:
- images (the more unique, the better)
- YouTube embeds
- diagrams or charts (you can create these on your own)
- HTML fanciness, like the text orange text above in the black square
- symbols and emojis
- gifs (you know these are my favorite thing to add)

Using HTML symbols is a super easy way to give your articles some pizzazz. This is my favorite reference for these.
You don’t want to overdo it with stuff like the symbols, but adding some 🌟stars🌟 around the name of your top product pick is a pretty nifty way to make it stand out.
And if you’re doing buying guides, add in some tables for your selected products.
Oh, and for images that you add to the post – make sure that they’re not huge in file size cause that shit will fuck with your page load time. Personally, I use Photoshop and the “save for web” option to optimize my photos.
Aim for images under 100 KB in size for the best results.
Are You Compliant?

If the article you’re posting is for affiliate content, then you need to make sure that you’re FTC compliant.
Even if you’re only promoting Amazon – having your disclosure hidden away on a page somewhere or in the footer of the page is no longer enough.
Some where high up on the page, either at the top or near where your first affiliate link appears, you must disclose the affiliate links.
Something like this will suffice:
**This post contains affiliate links and I will be compensated if you make a purchase after clicking on my links.
Simples, eh? Just make sure you do it so that you don’t lose your affiliate account!

It’s not just for Amazon affiliates — non-Amazon affiliate programs remind you how important this is when you use their links.
Get All Your Links In
Even if you’re not posting a buying guide with lots of affiliate links in it, you’re still probably going to have some outbound links in your post.
And if you don’t, then maybe should start looking for some relevant ones to add.
You can even just have links out to relevant content on your own site. In fact, definitely link to other relevant posts of yours when you have the chance.
And if you’re the kind of person who really wants to cover all the bases, then you should test out those affiliate links to make sure they’re working and that you didn’t accidentally make a typo.
I’ve done that, and it sucks. Nothing like finding out you’ve had a non-working affiliate link live that is broken and not earning you monies.

In my personal experience, tables are where I am most likely to have a typo in my affiliate links or other HTML code that I put there. So, I suggest paying special attention to that.
And, if you’re using any photos that require attribution, then this is a good time to get that squared away in the post.
Preview And Proofread
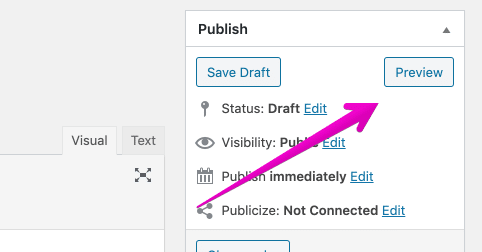
I don’t know what it is about the native WordPress text editor, but I always miss typos and other errors when I do my proofreading in it. And I’m much more likely to catch errors when I preview the post.

So, I suggest you do the same thing to give the post a good once-over before you make it live.
One of the things that I check for when I’m previewing a post is that I don’t have too much space in the article without some type of rich media to break up the text. Often I go back and rearrange where I’ve put gifs, images, etc. to break up the monotony of the text a bit more.
Check The Slug
Once you’ve previewed and corrected any errors, the final step is to optimize the URL slug.
There are two things to keep in mind when optimizing the slug:
- shorter is better
- it’s a great place for LSI keywords or your main keywords

If you’ve not done this before, it’s super easy. All you have to do is click the “edit” button like you see in the image above.
Make the slug whatever you want. You can see what I’d created for this post…but then I changed my mind after taking that picture. (that’s why it’s different now)
Once you get what you want in that area, click the “OK” button to save those changes.
Add The Featured Image & Select A Category
I know that not everyone uses featured images on their blog posts, but if you do, then go ahead and get that image and upload it in the featured image section.
You’ll also need to select a category for your new post that you’re publishing.
This is pretty basic stuff, but if you have problems with it just let me know.
Do The Final Preview
Now that everything is perfect, or so you hope, it’s time for that final preview. This time you get to see what it looks like with your featured image.
Publish And Check On Mobile
What I like to do is publish my post and then immediately see how it looks on my phone. I want to make sure that everything is showing up right and that there’s no blocks of text.
Most of the time, everything looks fine and I can move on. But every so often there will be an issue with a table not being responsive or something else weird.
If anything looks wonky on mobile, then this is the time to fix it before moving on to the next task on your list.
The tl;dr
Publishing new articles on sites is kind of time consuming. I don’t like to half-ass it, so I may take a few more steps than some people do.
I’m okay with that.
And I can admit that I spend an embarrassing amount of time looking for the perfect gifs for posts. Sometimes I even make them if I can’t find what I’m looking for already out there.
Do your steps include something that I’ve missed? Let me know…cause maybe I just forgot to include it here!
Hey, I’m Shawna. I make a living working from my laptop in places like London, Sydney, Dubai, Rome, Oslo, Bangkok, Las Vegas, Barcelona, and Amsterdam. I share how I do some of that on this website.

Great article Shawna
Nice article, thanks for sharing your insights.